Flare V5 builds on Cresset’s established structure-based design platform by integrating ligand-based methods to deliver a single molecule design solution. Not only is it packed with new and improved science, but it embeds functionality previously available in Forge™, such as qualitative and quantitative SAR models, pharmacophore building capabilities and expanded QSAR functionality powered by the Flare Python API. There have also been significant improvements to the speed and automation of Free Energy Perturbation (FEP) calculations as well as improvements to Molecular Dynamics.
The Cresset User Group Meeting on June 16th and 17th is the best way to hear about the latest developments at Cresset, including Flare V5 and invited presentations from customers, and I encourage you to register at the earliest opportunity.
However, the development of an integrated drug discovery platform goes beyond delivering cutting edge, robust science you can trust. Creating a great product is also about providing an agile, easy to use working environment you can comfortably and efficiently use whenever you have modeling work to do.
In this sneak peek, join me for an insight to some of the new and existing functionality of Flare which has been created to make your life easier and your interaction with Flare more efficient.
Synchronize the 3D View
In Flare V1 we chose to separate ligands and proteins into dedicated tables within the main interface. We felt that this gave many benefits to users as they interact with the molecules within Flare. In this version we have added new functionality that further improves on that original design decision and enables you to rapidly achieve your objectives.
However, the first feature I want to highlight comes as a direct result of the separation of ligands and proteins: the ability to keep the ligand and protein selection in sync in the 3D view (Figure 1).
This is useful if you are scrolling through a long list of ligand-protein complexes and you want to view each ligand in the active site of the protein it belongs to. Press the ‘Synchronize Selections’ button in the View tab and start scrolling. As you select one or more ligands, the associated proteins will also be selected and shown in the 3D window.
It works also the other way round: select a protein and the associated ligands will also be shown. Use ‘Grid’ if you want to see them in grid mode.
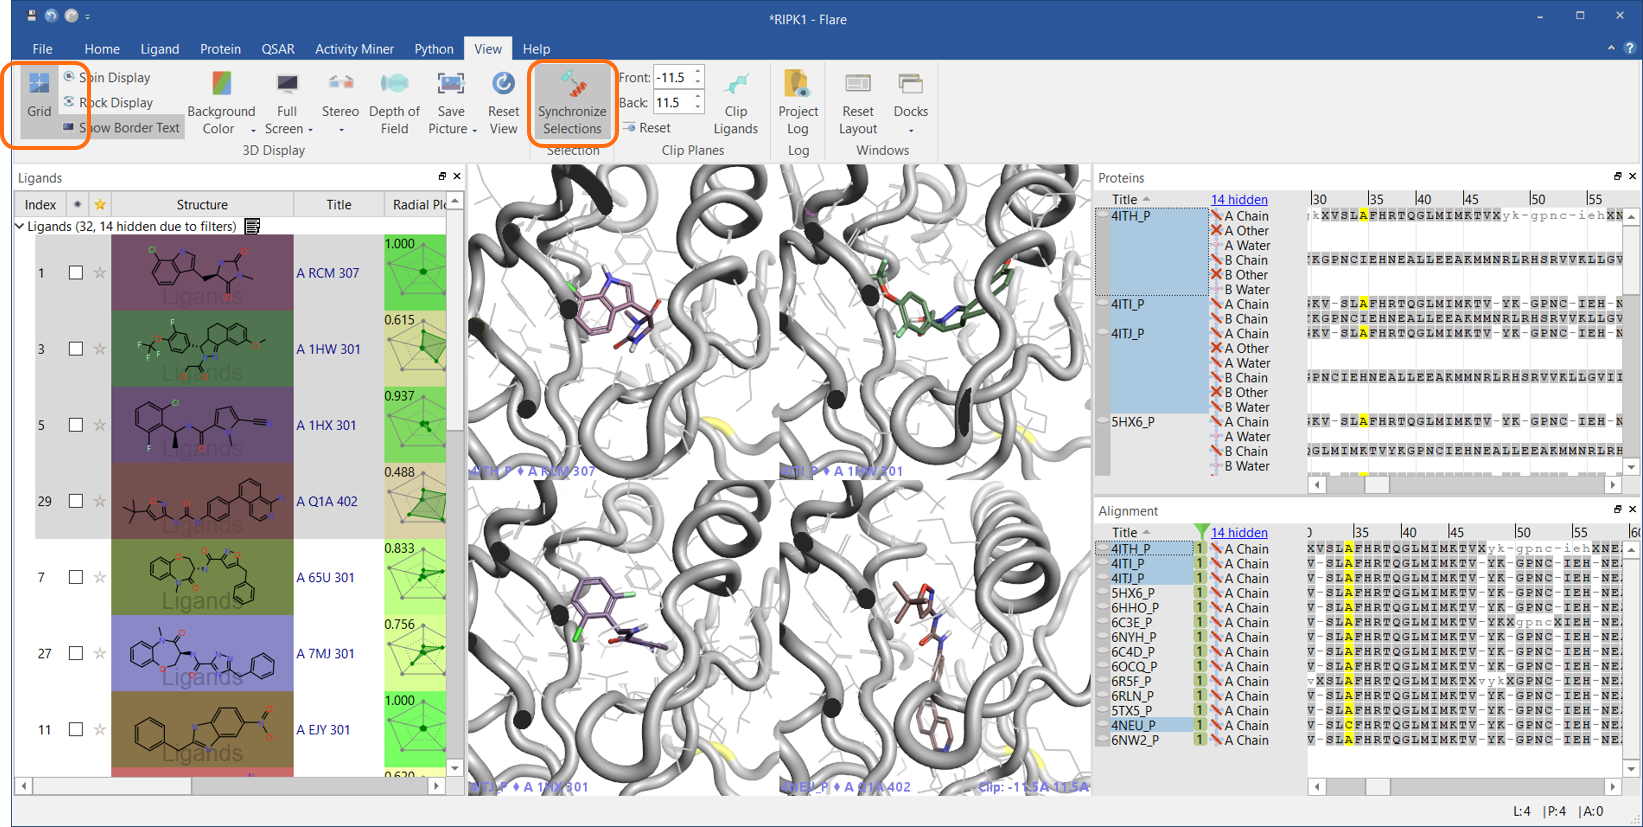
Figure 1: Use the ‘Synchronize Selections’ button to keep the ligand and protein selection in sync in the 3D view.
Perfect also for scrolling through the poses created by an Ensemble Docking experiment making sure you are always viewing the right protein.
Focus your view on the active site
You have just brought some interesting ligand-protein complexes in Flare and you want to have a look at ligand-protein interactions before your go ahead with your experiments. A quick way to focus the view on a specific ligand and start exploring how it sits in the active site is to press the new ‘Focus’ button in the Home tab of the main Flare menu (Figure 2).
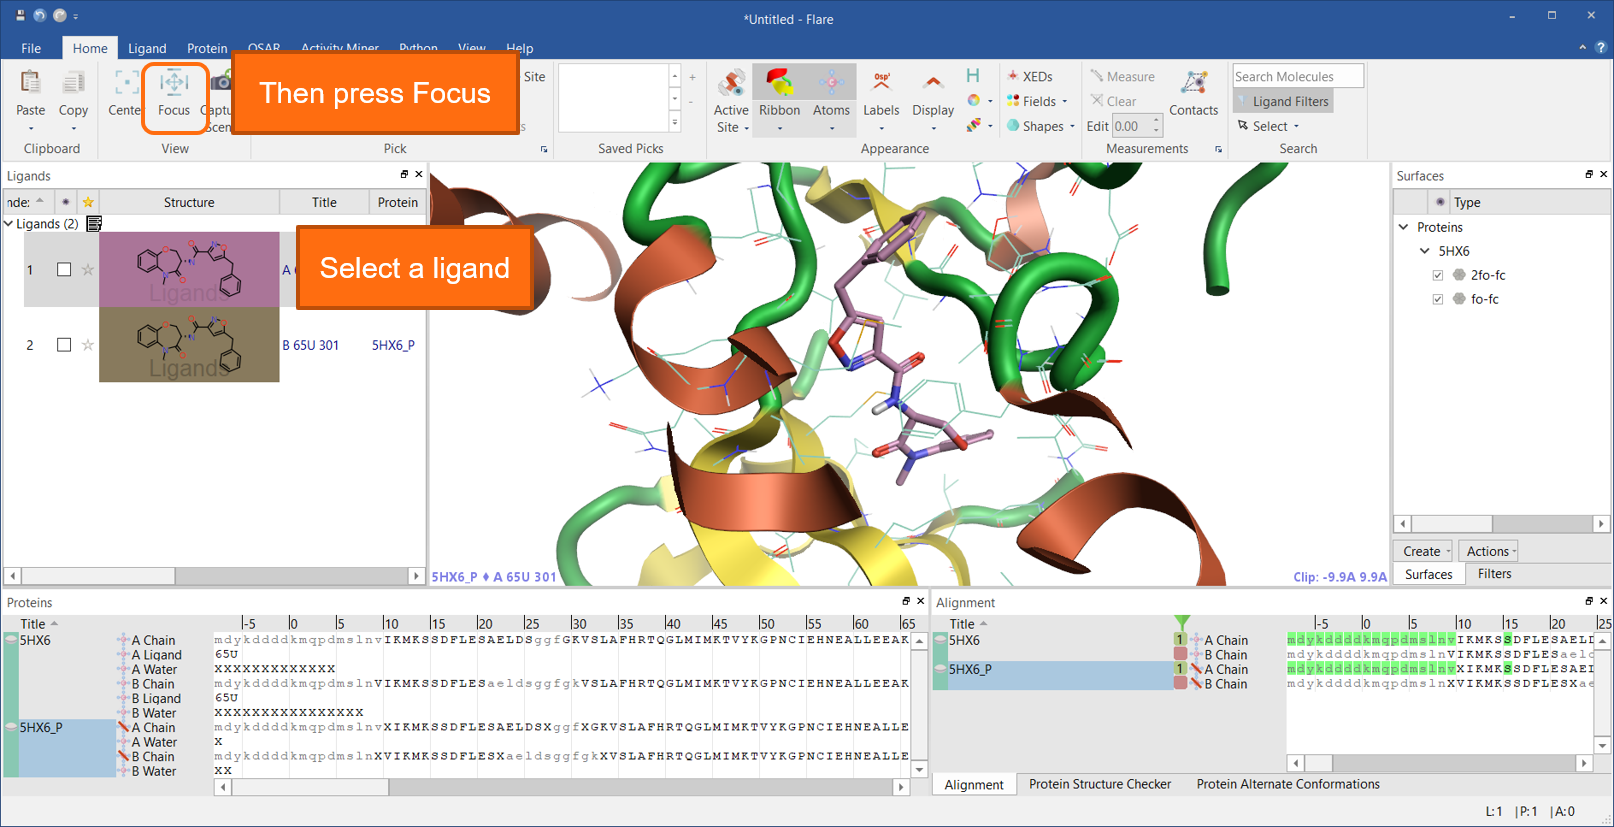
Figure 2: Press the new ‘Focus’ button in the Home tab to focus the view on a selected ligand.
Now you may want to create an informative view to save for later use.
In Figure 3, I have rotated the view a little, pressed the ‘Contacts’ button to show ligand-protein interactions, changed the ribbon style to tube (my favorite), changed the display of a few residues, added a bit of depth to the picture by adding a colored protein surface. Creating this picture just took a few clicks, and I saved it in the project Storyboard by pressing the ‘Capture Scene’ button, which has been moved to the Home tab so that it is easier to find.
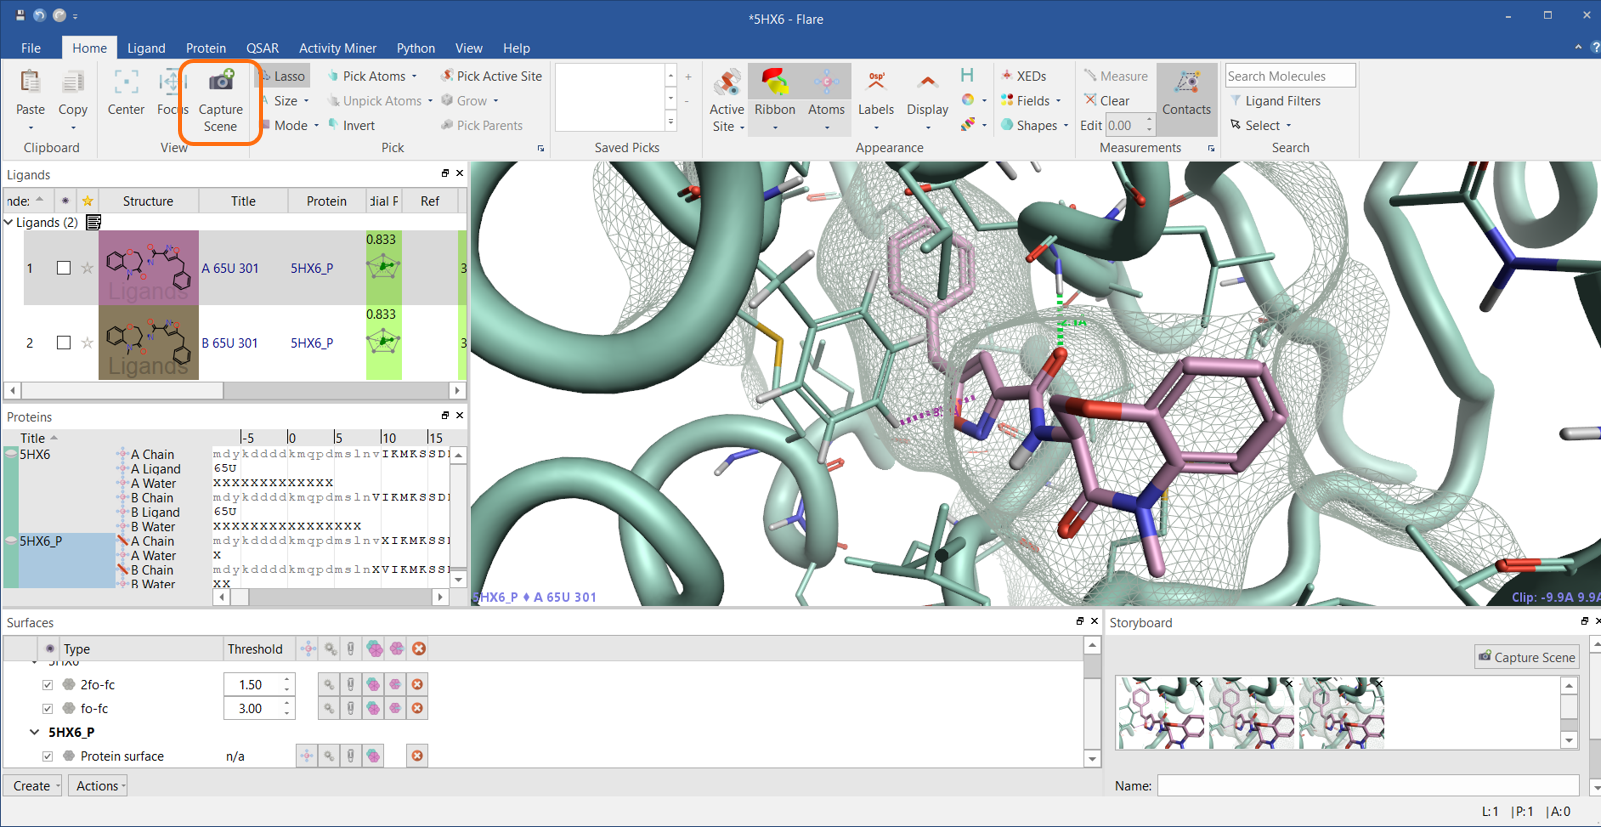
Figure 3: Press the ‘Capture Scene’ button to save informative views in the Storyboard.
Search for ligands and proteins
Have you ever ‘lost’ a molecule in your own project? Happens to me all the time. I know it is in there, but if the project is large, with tens, hundreds or thousands of ligands and many proteins, I occasionally struggle to locate it.
The new ‘Search’ box in the Home tab (Figure 4) enables you to search for ligands and proteins according to a variety of criteria.
- Ligand and protein name (* can be used as a wildcard)
- SMILES and SMARTS patterns
- Protein sequence, chain residue name, residue number, residues sequences
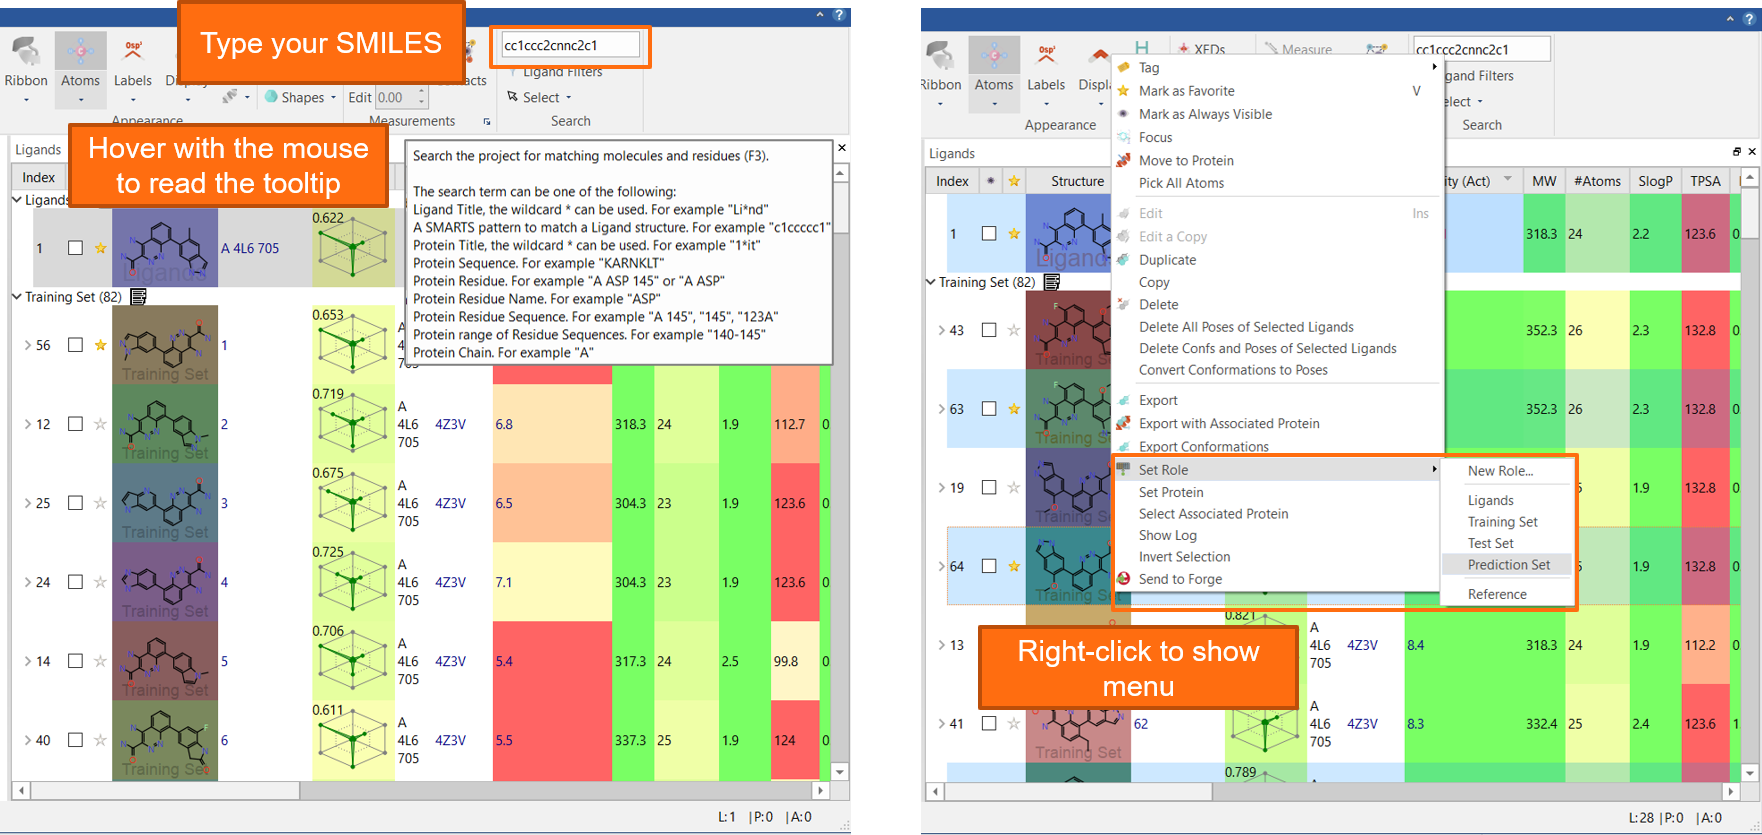
Figure 4: Flare V5 features a new ‘Search’ box in the Home tab to facilitate locating your ligands and proteins in the project.
For example: the project above contains 82 ligands taken from a patent (US patent 2015/0038510). I want to find all the ligands which have a 6-indazole R-group. All I have to do is to type the ‘cc1ccc2cnnc2c1’ SMILES in the Search box: I am informed that this matches 28 ligands, and I can press <Enter> to select them. I can now right-click to move them to the Prediction Set (a pre-defined role in Flare). Job done: it took overall 3 clicks to find the ligands I was looking for.
Of course, there are many other ways in which this workflow could have been completed (for example, setting a structure filter), but this was accomplished in an efficient way with a minimum number of clicks.
Search works also with proteins: see below for another workflow I commonly perform.
Hide and reveal proteins
You have a relatively large project where you have saved both the original and the prepared structures for all your proteins. You want to keep the original protein structures as they have the electron density maps and the alternate conformation information (both new in Flare V5): you may want these proteins at some point, but right now they clutter the view in the Proteins table. In the ‘Search’ box, type ‘_P’ and press <Enter>: this will select all the prepared proteins. Now from the Select drop-down menu, choose ‘Invert Protein Selection’: now all the original proteins are selected. Right-click on any of the proteins and choose ‘Hide’ (Figure 5).
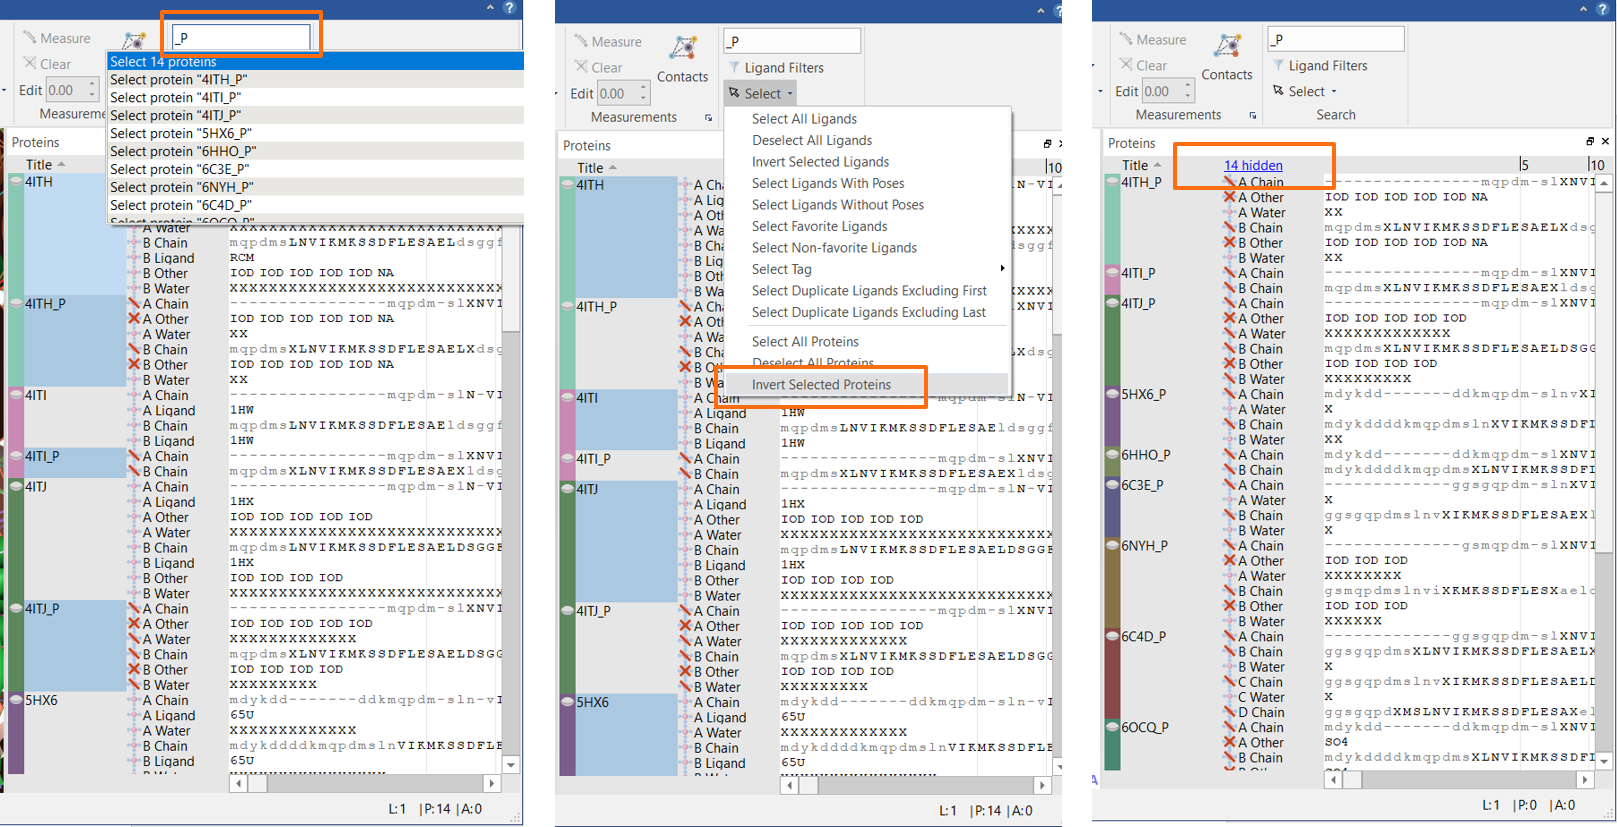
Figure 5: Flare V5 enables you to hide proteins from view.
Now that I have discovered how to hide the proteins which I don’t want to show right now, how can I bring them back? Easily done: click on the ‘hidden’ link and decide whether you want to unhide only a specific protein, or all (Figure 6).
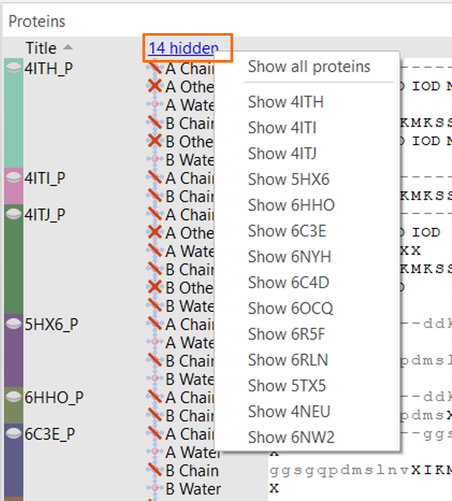
Figure 6: Reveal proteins hidden from view.
Easier interaction with the Ligands table
Flare V5 now makes it easier for you to work with the Ligands table. We have had ‘Roles’ in the table that enable organizing ligands into separate groups – for example those with biological data and those without – since Flare V1. In this version we have added a ‘Select’ button that enables you to select all the ligands in a role with one click, without interfering with the scrolling up and down on your list of ligands with the keyboard arrows. Using the right-click menu on a role name, you can move a whole role of ligands up or down in the list to move the most important roles at the beginning of the table, or duplicate a whole role (Figure 7).
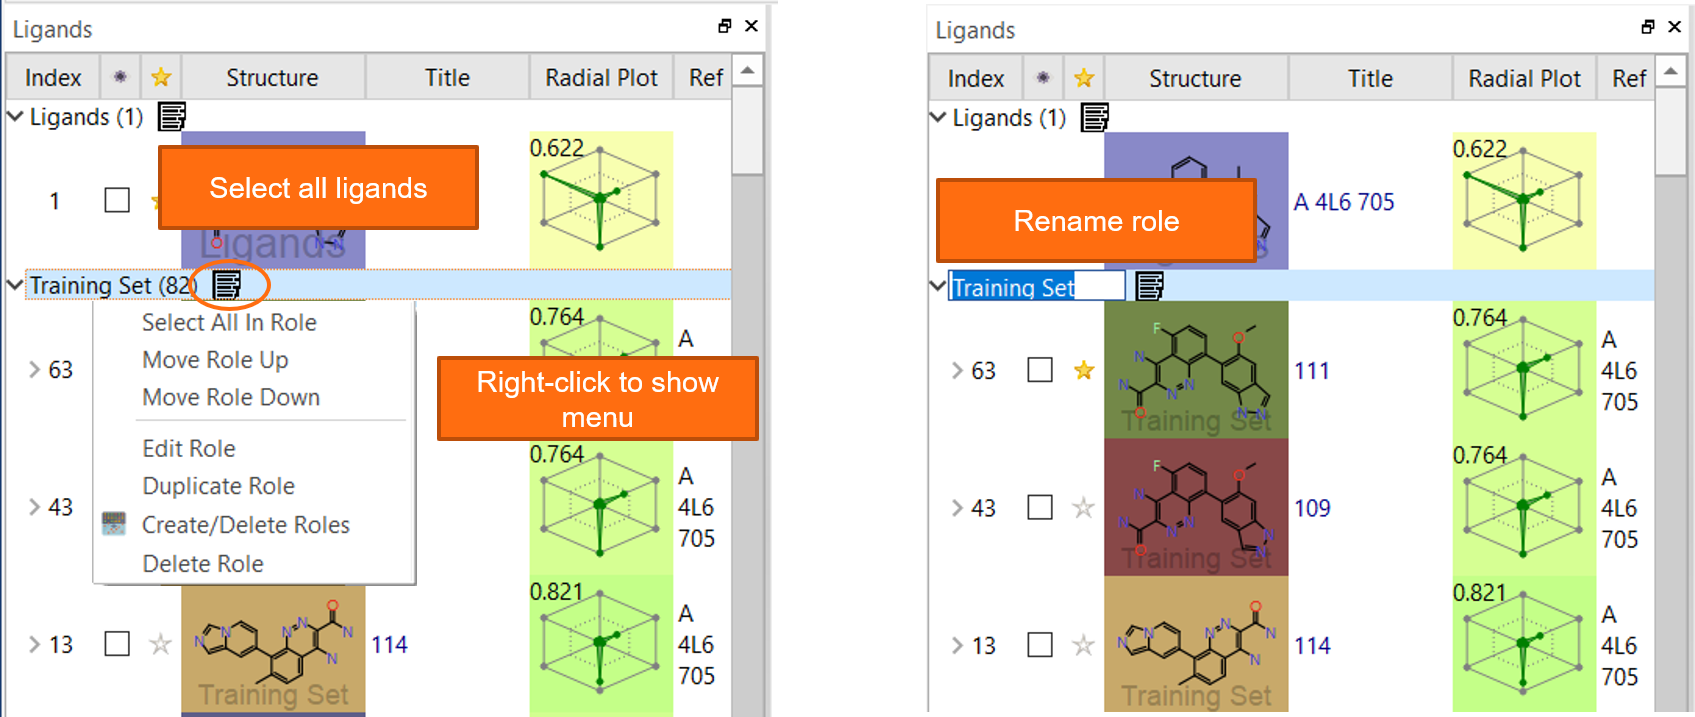
Figure 7: Flare V5 features enhanced functionality for managing roles in the Ligands table.
As part of the transition of Forge into Flare, we have introduced pre-defined role names (Training Set, Test Set, Reference, Prediction Set) to help you build your QSAR models. In Flare however there is no need to use these roles (unless you want to), as QSAR model building now works on any role as long as it includes all the relevant ligands.
Guided Tours to support Forge users of Flare
To assist Forge users with the transition to Flare V5, or if you are new to Flare, you can access a series of Guided Tours in the Help tab. These step-by-step tutorials will help you familiarize with the set-up and running of ligand-based alignment, docking and scoring, QSAR building and pharmacophore creation experiments (Figure 8). We will be adding to this, so if you have a particular feature you’d like a Guided Tour for, let us know and we’ll prioritize those in demand the most.
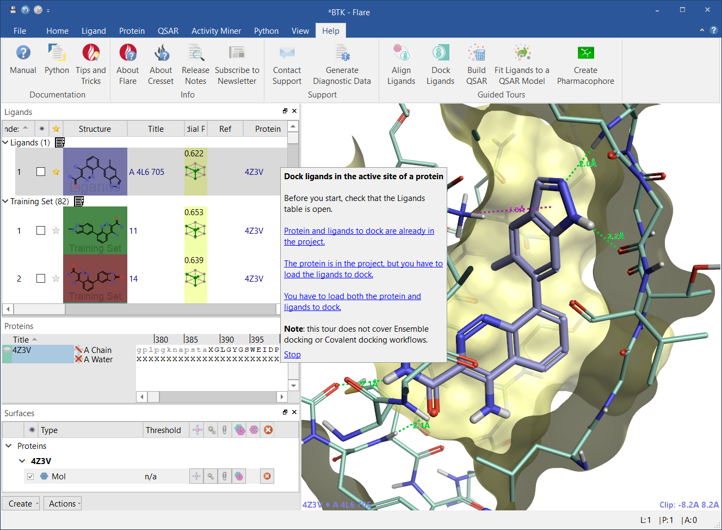
Figure 8: Guided Tours provide step-by-step tutorials on features of Flare V5.
Organize your protein surfaces
Flare gives you the option of various types of protein surface, e.g., the choice of coloring the solvent-excluded surface of the protein by atom color, solid color, electrostatic potential, Electrostatic Complementarity™ towards a chosen ligand, secondary structure and hydrophobicity. In addition, you can show positive and negative protein fields, as well as hydrophobic and shape fields.
In Flare V5, the Surfaces window (where all proteins surfaces are saved), has been improved so that it is easier to keep them well organized.
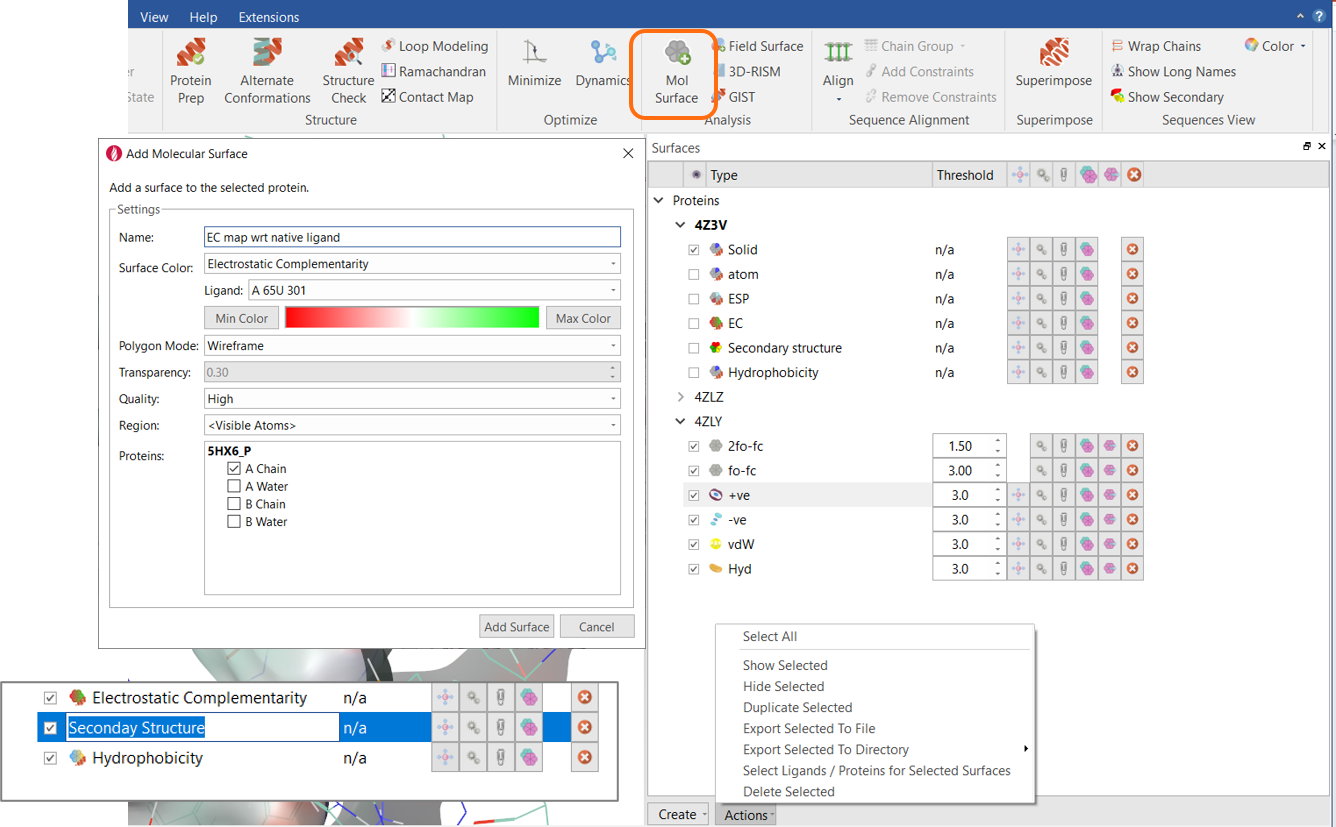
Figure 9: Surfaces window in Flare.
As in previous versions of Flare, as you create a protein surface you can decide which type of color you want to apply, the type of surface to apply (solid or wireframe), the quality and if appropriate transparency of the surface, the region where the surface will be calculated (all protein, visible atoms or picked atoms), and which protein chains are included.
In addition, if you create multiple surfaces for the same protein, you can give them a name. This makes them much easier to find, and they can easily be renamed by double clicking on the surface name and typing a new name.
Buttons for duplicating a surface and exporting/importing some surfaces types in different file formats have also been added. The actions button can be used to perform bulk actions – for example you can select all surfaces and duplicate or delete them.
Learn more about the ligand and structure-based methods in Flare V5
I will introduce Flare V5 at the Cresset User Group Meeting on June 16th. On June 17th Mark Mackey, Cresset CSO, will present the science behind structure-based design in Flare V5. I encourage you to register for the meeting to learn more about Flare V5 and have the opportunity to ask us questions.
If you’re interested to find out how Flare V5 will benefit your project, request an evaluation to try it for yourself.